
Let’s use Still Scenes to make shaker cards.
I love coordinating products and the Still Scenes, Snow Globe Scenes Dies and Snow Globe Shaker Domes work together seamlessly.
Snow globes are fun. Christmas and cosy winter scenes come to mind when I look at a snow globe. Do you have a favourite one from your childhood? Did your family collect them? I remember ours was a heavy plastic one with a child playing in the snow.
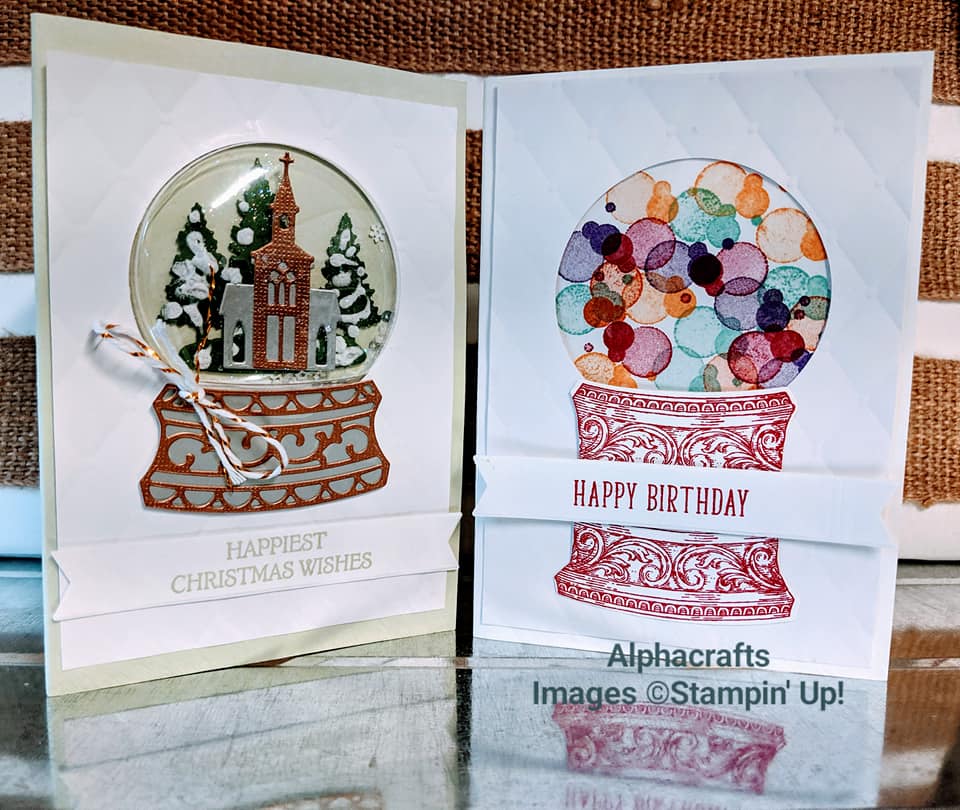
Today I’m going to run through some instructions on how to make a snow globe shaker card. Refer to the Christmas card in the photo to better understand the instructions.
- Die cut the base of the snow globe in a small piece of gold and silver card stock and then assemble with multi-purpose glue. Attach it to the bottom of your Basic White card front.
- Now die cut the dome on top of the gold and silver base that you stuck on the Basic White so that you have a hole for the plastic dome to be attached later on.
- On a green card base, trace the position of the dome with a pencil. To do this, you need to align your Basic White card front over the green card base so you can trace the hole of the dome. Then stick the trees and the church die cuts inside the pencil mark on your green card base.
- Apply puff paint to the trees so it looks like it’s snowing.
- Add sequins by carefully placing them in the middle where the church is positioned. Don’t move the sequins around because we don’t want them at the edges of the pencil mark. Leave this flat on the table while you do the next step.
- Now go back to your Basic White card front and attach the plastic shaker dome to the hole. To do this, peel back the sticker backing and attach it on the underside of the card. You should now have a plastic dome attached to the gold and silver base of your snow globe.
- Next, peel the adhesive backing found on the other side of the plastic dome so that you can attach your Basic White card front to your green card base, making sure that they align. Just follow the pencil mark. Be careful with the sequins!
- Stamp and add a greeting. You can also embellish with a ribbon like what I’ve done in my card.
How to make the birthday card:
- Stamp your base twice and die cut. Next, stack them together on your Basic White card front (refer to the photo above) so it looks like the base of a gumball machine.
- Die cut the dome and attach a window sheet on the underside to cover the hole.
- Stamp balls on your card base.
- Attach your card front to your card base.
- Stamp a greeting and attach it to cover the middle part of the 2 bases that you stacked.
Here’s a list of materials used:
- Still Scenes Stamp Set
- Snow Globe Scenes Dies
- Snow Globe Shaker Domes
- Snowfall Accents Puff Paint
- Snowflake Sequins
- Multipurpose Glue
- Basic White A4 Card Stock
I hope that you enjoyed this card inspiration and that you’ll also give Still Scenes shaker cards a go.
Check out the online store for current products to help you make shaker cards and snow globes.
Also, would you like to make them in class? Let me know so we can organise one for you. Bring along your friends too so you can share the experience.
Are you also looking for other fun papercraft projects? Visit my events page and book in. There’s always something new to learn.